This section is entirely based on the basics of calculator programming. It is aimed toward the TI-83 and the TI-83+. This tutorial will cover the following topics:
If you don't understand some of the material or if you just want to ask some questions, then contact us and we will assist you.
Let's begin...
Starting New Programs
Okay, this is pretty simple. First, press the PRGM button. Then, use the arrow buttons to move the cursor over the word "NEW". When "NEW" is highlighted, press ENTER.
The calculator will then ask you to give a name to the program. You can choose any name that you want. Once you have typed in the name, press ENTER again.
Now, you are in the Program Editor. This is where you can make/edit your programs. To get out of the Program Editor, press 2ND, MODE and you will go back to the home-screen.
To run your program, press PRGM, scroll down to the program you want to run and press ENTER.
To edit your programs, press PRGM, go over to the right and highlight "EDIT", scroll down to the program you want to edit and press ENTER. Now you are in the Program Editor, again.
Displaying Things and Clearing the Screen.
Okay, there is a lot of stuff to learn in this unit, so lets go through it one step at a time...
PART 1: The Disp Command
The easiest way to display stuff on the screen is to use the "Disp" command.
In order to use it, do the following:
In the program editor, press the PRGM button. Go over to the right until "I/O" is highlighted at the top. Then, scroll down to Disp and press ENTER. Now the Disp command has been inputed into the program editor.
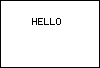
Okay, lets make it display "HELLO." To do that, copy down the following:
Disp "HELLO"
To view the program, get out of the program editor (2ND, MODE) and run your program. It should display "HELLO". If it doesn't then try it again.
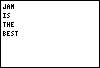
Here is a tip: When you use "Disp" you can only display things on one line at a time. In order to write something longer, you have to use numerous Disp's. Here's an example:
Disp "DC-PLANET" Disp "IS THE BEST" Disp "PLACE FOR GREAT" Disp "TUTORIALS AND" Disp "PROGRAMS."
I suggest that you play around with Disp and get used to it.
PART 2: Clearing the Screen
"Well, can't I just press the clear button?"
Sorry, but when you're in a program, it's not that easy.
The command you must use for clearing the screen is ClrHome.
Heres how to use it:
In the program editor, press PRGM, highlight "I/O" at the top, scroll down to ClrHome and press ENTER. ClrHome has now been inputed into the program editor.
If you run this program now, it will simply clear the screen. It should look like this:
The ClrHome at the beginning made sure that the text below it would be the only thing on the screen. This is what it should look like:
If you have any questions on ClrHome, just ask us.
PART 3: Using the Output Command
The Output command is an easier and more efficient way of displaying things. You can do a lot more with Output than you can do with Disp, so it's very important to learn.
Here's how to get it:
Press PRGM, highlight "I/O" and scroll down to Output.
Okay, in order to learn Output, you first need to understand that the homescreen (The homescreen is the screen that is NOT the graph. For example, when you turn on the calculator, you go strait to the homescreen.) is made up of 8 horizontal rows and 16 vertical columns. It's kind of like an 8 x 16 grid. When you use Output, you must use these rows and columns like coordinates.
So let's say that you want to put "HELLO" on the third row and the sixth column. The code would look like this:
Once again, I suggest that you play around with Output and get the hang of it.
Using the Pause Command.
The Pause command can be very useful when making your programs, so I suggest that you learn it.
To input it into the program editor, press PRGM, highlight CTL and scroll down to Pause.
Okay, basically Pause does just what it sounds like it does: It pauses the program. And, it keeps it paused until the user presses ENTER. The Pause command can be used in a number of different ways and situations. Here's an example:
Clrhome Output(3,1,"HELLO" Pause Clrhome Output(3,1,"HOW ARE YOU?"
Let's break that down:
First it clears the screen.
Then it displays "HELLO" on the third row and first column.
Then it pauses the program and waits for the user to press ENTER.
Then, after the user presses ENTER, it clears the screen again.
And finally, it displays "HOW ARE YOU?" on the third row and first column.
If you need further explaination on the Pause command, you can just e-mail us and we'll get back to you.
As always, I suggest that you play around with the Pause command and get the hang of it.
Using the Graph.
There are many things that you can display on the graph, such as lines, circles, text and points. All of these things can be used for math purposes and just plain fun.
Okay, lets start with the most basic aspect of this section: Clearing the graph. In order to do that, you must use a command called ClrDraw.
To input it into the program editor, press 2nd/PRGM, highlight "DRAW" at the top and select ClrDraw.
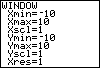
Okay, the graph on your TI-83 or TI-83+ is just like a regular graph. With the default settings, the x-axis goes from -10 to 10 and the y-axis goes from -10 to 10. Do you want to know if your graph has the default settings turned on? Okay, well go to the homescreen and press the "WINDOW" button at the top. If the default settings are in place, then it should look like this:
If that is not what your window looks like, then change it.
If you're wondering what all of that stuff in the WINDOW means, then here you go:
Xmin is the lowest the x-axis can go to.
Xmax is the highest the x-axis can go to.
Ymin is the lowest the y-axis can go to.
Ymax is the highest the y-axis can go to.
Okay, now we'll talk about how to display things on the graph.
Lines
To make lines, you must use the "Line" command. You can get it by pressing 2nd/PRGM, highlight "DRAW" and select "Line."
Let's start with a simple example:
ClrDraw Line(1,5,7,5
The first 2 numbers (1 and 5) are the coordinates of the first endpoint. And the last 2 numbers (7 and 5) are the coordinates of the last endpoint. So, the calculator just takes those 2 endpoints and connects them, thus making a line. Here is what it should look like:
By the way, if you want to get rid of the axes, just get into the program editor, press 2nd/ZOOM and select "AxesOff." And if you want to turn the axes on, go to the same place and select "AxesOn." Normally, you would want to input these commands at the top of your program editor.
Circles
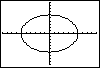
In the program editor, press 2nd/PRGM, highlight "DRAW" and select "Circle."
To make a circle you must enter the coordinates of the center of the circle and the length of the radius (in points). Here's an example:
Circle(0,0,6
The first 2 numbers (0 and 0) are the coordinates of the center of the circle. And the last number is the length of the radius (in points). It should look like this:
Points
To display a point on the graph, you must use the "Pt-On" command.
Press 2nd/PRGM, hightlight "POINTS" and select Pt-On.
Okay, this is a pretty easy command to use. Just enter in the coordinates of where you want the point to go and you're done. Here's an example:
Pt-On(5,-3
Now, when you run the program, it should display a small point on the coordinates (5,-3). Pretty easy, huh?
Okay, there is also a command called Pt-Off. It is located in the same place as Pt-On and it is also very easy to use. The name basically says it all. Instead of displaying a point, it erases a point.
Here is some fairly simple code that uses the Pt-On and Pt-Off commands:
ClrDraw Pt-On(6,9 Pause Pt-Off(6,9
Get it? First it displays the point at (6,9) and then it erases the point.
Text
When you display text on the graph, you must use the "Text" command. To insert it into the program editor, press 2nd/PRGM, highlight "DRAW" and select "Text."
The Text command is fairly similar to the Output command because you must enter in the row number and column number for both of the commands. However, the graph is a little bit different than the homescreen. The homescreen has 8 horizontal rows and 16 vertical columns, but the graph has 62 horizontal rows and 94 vertical columns. Let's try an example:
Once the program is run, it should look like this:
NOTE: On some calculators, you can only use 58 rows instead of 62. If you try to display something on a row higher than the 58th row and you get a DOMAIN error, then you may only be able to use 58 rows. Just experiment with it and you'll figure everything out.
If you have any further questions on the subject, just ask us.
Creating and Using Variables.
Definition of a variable: A letter or a symbol that replaces a number.
There are 27 different variables that you can use on your calculator: A - Z and � (The � is located above the 3 button).
In order for a variable to replace a number, you must "store" a number into the variable. To store a number into a variable, you must use the STO� button. It is located above the ON button.
Here's an example of how to store a number into a variable:
26�L
26 has now been "stored" into L. So now, L is equivalent to 26. Get it?
NOTE: When you store a number into a variable, you can do it on the homescreen or in a program. However, 90% of the time, you will do it inside a program.
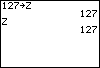
Here is how it looks when you store a number into a variable on the homescreen and NOT using a program:
I stored 127 into Z. And now, Z is the equivalent of 127. To prove that, I put Z in there and pressed enter.
You can also manipulate variables, as well. You can change them in many different ways. Start a new program and enter in the following code:
ClrHome 99�X Disp X Pause X+1�X Disp X
Get it? First I stored 99 into X and displayed it. Then, after the user presses ENTER, I made the calculator add 1 to X and display it again. Try it out for yourself!
The more advanced aspects of variables are explored further in this tutorial and our Advanced Programming tutorial, as well.
Making Forumla Programs.
Most calculator programmers will agree that formula programs are the easiest programs to make. However, you must be able to use and create variables on the calculator, so if you haven't read the "Creating and Using Variables" section in this tutorial, I suggest that you go over it.
Okay, there are a couple of different ways to make a formula program, so let's start with the easiest.
In order to make a formula program, you must allow the user to enter in numbers. This is done with the "Prompt" command. To insert the Prompt command into the program editor, press PRGM, hightlight "I/O" and select Prompt.
Here is an example of how to use it:
ClrHome Prompt X
After the program is run, it should display something like this: X=?
Then the user can enter in any number that he/she wants to. And after the user presses enter, whatever number that they punched in, is now represented by X.
Confused? Well, here's an example that may clear it up.
ClrHome Prompt Q Clrhome Output(5,1,Q
Get it? When the user enters in the number, it is stored into Q. So when Q is displayed, it will shows whatever number you entered in. Note that I did NOT put quotations around Q when I displayed it. When you want to display a variable, you should never put quotations around it. If you do, it will simply display the letter.
Now it's time to manipulate the variables. Remember how we did that in the previous section? Let's start with an easy example. This is a formula program for the area of a rectangle:
ClrHome Prompt B Prompt H B x H�A ClrHome Output(1,1,"THE ANSWER IS:" Output(2,1,A Pause Stop
If you're confused, don't worry. Let's break that down step by step:
1. Clears the screen. 2. Asks you for the measurement of the base. 3. Asks you for the measurement of the height. 4. Multiplies the base times the height and stores the answer into "A" 5. Clears the screen again. 6. Displays the answer. 7. And finally, after the user presses ENTER, the program will stop. (NOTE: The Stop command is just an easy way to stop a program.)
Before we go on to the next method, here are a couple more examples:
Circumference Of A Circle ClrHome Prompt D Dπ�A ClrHome Output(1,1,"THE ANSWER IS:" Output(2,1,A Pause Stop
Pythagorean Theorem ClrHome Prompt A Prompt B A� + B��C [square root of]C�C ClrHome Output(1,1,"C=" Output(2,1,C Pause Stop
Okay, now let's move on to the next method of formula programming. This next method is a much better way to write a formula program and it's pretty easy, too.
This method uses the "Input" command. Press PRGM, highlight I/O and select Input.
Here's the basic concept:
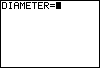
ClrHome Input "DIAMETER=",X
See, with Input, you can ask for more specific things. In this example, I asked for the diammeter. And the number that is entered in is stored into X.
When the program is run, it should look like this:
Let's try a full example. This forumla program is for the area of a triangle . Copy this into your calculator:
Get it? First, the user enters in the measurments for the base and the height and then those numbers are plugged into the forumla.
As always, if you have any questions, you can just ask us.
Lbl and Goto Commands
The Lbl(Label) and Goto commands allow you to jump around to different places in the code. Here is an example:
Lbl A Disp "HELLO" Goto B Lbl C Disp "GOODBYE" Stop Lbl B Disp "HOW ARE YOU?" Goto C
Menus and the Menu( Command
The Menu( command is used to create a graphical menu for the user. The syntax looks like this:
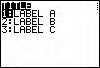
Menu("Title of Menu","First Choice",Label,"Second Choice",Label
If the user selects a certain menu choice, it will then go to the corresponding Label. Here is an example:
Menu("TITLE","LABEL A",A,"LABEL B",B,"LABEL C",C
If-Then-Else Statements
If-Then-Else statements are used to make decisions within the program. They follow 3 different types of syntax:
If condition single line of code
If the condition is true, then the next line of code is executed. NOTE: When you do not use "Then", you cannot have more than 1 line of code that corresponds to the If statement.
If condition Then code ... End
If the condition is true, then all of the code between "Then" and "End" is executed.
If condition Then code ... Else code ... End
If the condition is true, then all of the the code between "Then" and "Else" is executed. If the condition is false, then all of the code between "Else" and "End" is executed.
Loops
PART 1: Using For Loops
An in-depth For Loop tutorial is available here.
PART 2: Using Repeat Loops
The Repeat loops follow this syntax:
Repeat condition code End
All of the code inside the loop will be repeated until the condition is true. Here is an example:
1 -> X Repeat X=10 X+1 -> X End
X is continually increased by 1 until X is 10.
PART 3: Using While Loops While loops follow a similar syntax.
While condition code End
The code inside of the loop is repeated while the condition is true. Here is an example:
1 -> X While X<10 X+1 -> X End
X is continually increased by 1 while X is less than 10. So, once X equals 10, the loop will end.
The getKey Command
Go here for an entire tutorial dedicated to getKey.
Strings
Go here for an entire tutorial dedicated to strings.
Subroutines
Subroutines are often a valuable part of good games. It can save memory and increase program speed. To create a subroutine, you must use the prgm and Return commands.
The prgm command calls/executes another program. Its really simple:
prgmGAME
The code above will call/execute a program called "GAME".
The Return command will return you to the exact place in the program where you came from.
So, here is a (bad) example of a subroutine using these 2 commands:
PROGRAM X ClrHome Repeat 0 Output(1,1,"Press 2nd getKey If Ans=21 prgmZ End
PROGRAM Z ClrHome Disp "U PRESSED 2nd Pause ClrHome Return